Chapter 1 Setup

1.1 Starting a new book

1.1.1 Create a new github repository

For psyTeachR courses, the repository should be created by the course lead on the psyTeachR github and have a name structure like this:

  • dataskills-v1
  • dataskills-v2

You can do this on the github site, or through the code below.

myrepo <- "ads-v1"
usethis::create_project(myrepo)

A new project will open, type the next commands in the console in that project.

Set up git. You will need to choose the "Yes" option twice.

usethis::use_git()

Make sure the .gitignore file is set to ignore potentially private info.

usethis::git_vaccinate()

Add this to the psyTeachR github. This should prompt you to commit changes and open up the github page on your web browser.

usethis::use_github("psyteachr")

Set up the website (GitHub Pages).

usethis::use_github_pages(
  branch = usethis::git_branch_default(), 
  path = "/docs")

Contact Lisa or Dale to update the redirect from the base name (e.g. "pyteachr.github.io/dataskills/") to the new version.

1.1.2 Fork the repository

Our main course pages are under https://psyteachr.github.io, but you should work on your course page on a forked version in your own github account.

The code below deletes "ads-v1" from your working directory, forks the repository ads-v1 from psyteachr to your own, and makes a local copy in your working directory. Set the destdir argument to save it elsewhere.

# delete local repository
unlink(myrepo, recursive = TRUE)

# fork the psyTeachR repo to your github
usethis::create_from_github(
  repo_spec = paste0("psyteachr/", myrepo), 
  fork = TRUE)

Continue working in this new project, set up the website (GitHub Pages).

usethis::use_github_pages(
  branch = usethis::git_branch_default(), 
  path = "/docs")

1.1.3 Update packages

The books assume you have the following packages:

  • tidyverse
  • bookdown (>= 0.22)
  • webex (>= 0.9.2)
  • glossary (devtools::install_github("psyteachr/glossary"))

1.1.4 Download the template

Download the psyTeachR Bookdown Course Template to your computer, unzip it, and move the files into your new RStudio project inside a directory called "book".

temp <- tempfile()
download.file("https://psyteachr.github.io/book-template/files/book.zip",temp)
utils::unzip("book.zip", exdir = myrepo)

1.1.5 Edit the template

1.1.5.1 _output.yml

Open _output.yml. It should look like this:

bookdown::gitbook: 
  default: true
  md_extensions: -smart
  df_print: kable
  includes:
    in_header: include/header.html
    after_body: [include/footer.html, include/webex.js]
  css: [include/psyteachr.css, include/webex.css, include/style.css]
  config:
    toc:
      collapse: section
      scroll_highlight: yes
      before: |
        <li><a href="./">Book Template</a></li>
        <li><a href="https://zenodo.org/badge/latestdoi/166559207"><img src="https://zenodo.org/badge/166559207.svg" alt="DOI"></a></li>
      after: |
        <li><a rel="license" href="https://creativecommons.org/licenses/by-sa/4.0/" 
            target="blank"><img alt="Creative Commons License" 
            style="border-width:0" 
            src="https://i.creativecommons.org/l/by-sa/4.0/88x31.png" /></a></li>
        <li><a href="https://psyteachr.github.io/books" target="blank">PsyTeachR Books</a></li>
    download: []
    fontsettings:
      theme: white
      family: sans
      size: 2
    sharing:
      facebook: yes
      twitter: yes
      google: no
      linkedin: no
      weibo: no
      instapaper: no
      vk: no
      all: ['facebook', 'google', 'twitter', 'linkedin', 'weibo', 'instapaper']
bookdown::pdf_book:
  includes:
    in_header: include/preamble.tex
  latex_engine: xelatex
  citation_package: natbib
  keep_tex: yes
bookdown::epub_book:
  stylesheet: [include/epub.css]
  cover_image: images/logo.png
  toc: true
  toc_depth: 2

Change "Book Template" in the config:toc:before: section to the name of your book. This is the text readers will see at the top of your table of contents that brings them back to the start of the book.

Save and close this file.

1.1.5.2 header.html

Open include/header.html. It should look like this:

<!-- Global site tag (gtag.js) - Google Analytics -->
<script async src="https://www.googletagmanager.com/gtag/js?id=G-6NP3MF25W3"></script>
<script>
  window.dataLayer = window.dataLayer || [];
  function gtag(){dataLayer.push(arguments);}
  gtag('js', new Date());

  gtag('config', 'G-6NP3MF25W3');
</script>

Update the google Analytics Tracking ID (or delete this text) if your book isn't in the psyteachr.github.io domain.

Save and close this file.

1.1.5.3 _bookdown.yml

Open _bookdown.yml. It should look like this:

book_filename: "_main"
new_session: yes
output_dir: "docs"
before_chapter_script: ["R/psyteachr_setup.R", "R/my_setup.R"]
delete_merged_file: true
clean: []
language:
  ui:
    chapter_name: "Chapter "
  label:
    fig: 'Figure '
    tab: 'Table '
    eq: 'Equation '
    thm: 'Theorem '
    lem: 'Lemma '
    cor: 'Corollary '
    prp: 'Proposition '
    cnj: 'Conjecture '
    def: 'Definition '
    exm: 'Example '
    exr: 'Exercise '
    proof: 'Proof. '
    remark: 'Remark. '
    solution: 'Solution. '

You can change the chapter_name from "Chapter " to "Lab " or something else that makes sense for your course if you want. Leave the labels alone unless you're translating to another language.

Save and close this file.

1.1.5.4 index.Rmd

Open _index_example.Rmd. The top YAML header should look like this:

--- 
title: "Template Course"
author: "psyTeachR"
date: "2021-08-23"
site: bookdown::bookdown_site
documentclass: book
bibliography: [book.bib, packages.bib]
biblio-style: apalike
link-citations: yes
description: "This is a template. Use it to start a new course book."
url: "https://psyteachr.github.io/template-v1"
github-repo: "psyteachr/template-v1"
cover-image: "images/logo.png"
apple-touch-icon: "images/apple-touch-icon.png"
apple-touch-icon-size: 180
favicon: "images/favicon.ico"
---

Update the title, author, and description strings. Make sure the url and github-repo match your new repository.

We'll set up the images for the cover-image, apple-touch-icon and favicon in the next section. Delete these lines if you don't want social media images.

For now, don't change anything in the cite-packages R chunk at the top. This just automatically creates a bibliography file for the specified R packages.

Now you can edit the overview. Replace the filler text with a description of your course and fill in the course aims and ILOs.

The {-} at the end of the overview title makes sure this chapter isn't numbered.

Save this file with the name index.Rmd.

1.1.5.5 Logos

Save a logo image at "images/logo.png". This is the image that will be shown when people share your site on social media.

Upload your logo to the Favicon Convertor to create the little icon that shows in the toolbar of web browsers and the apple-touch icon. Add "favicon.ico" and "apple-touch-icon.png" to the images directory.

You can check that this is properly configured after you publish you website by putting the URL in the Twitter Validator or the FaceBook Validator.

1.1.6 Render the book

Now you're ready to create the book. Run the following code in the console. This code lets you keep the book files in a subdirectory and render without changing working directories. browseURL opens the results in a browser.

browseURL(
  xfun::in_dir("book", bookdown::render_book("index.Rmd", "bookdown::gitbook"))
)

You'll see a lot of text in the console window, which should end in something that looks like:

Output created: ../docs/index.html

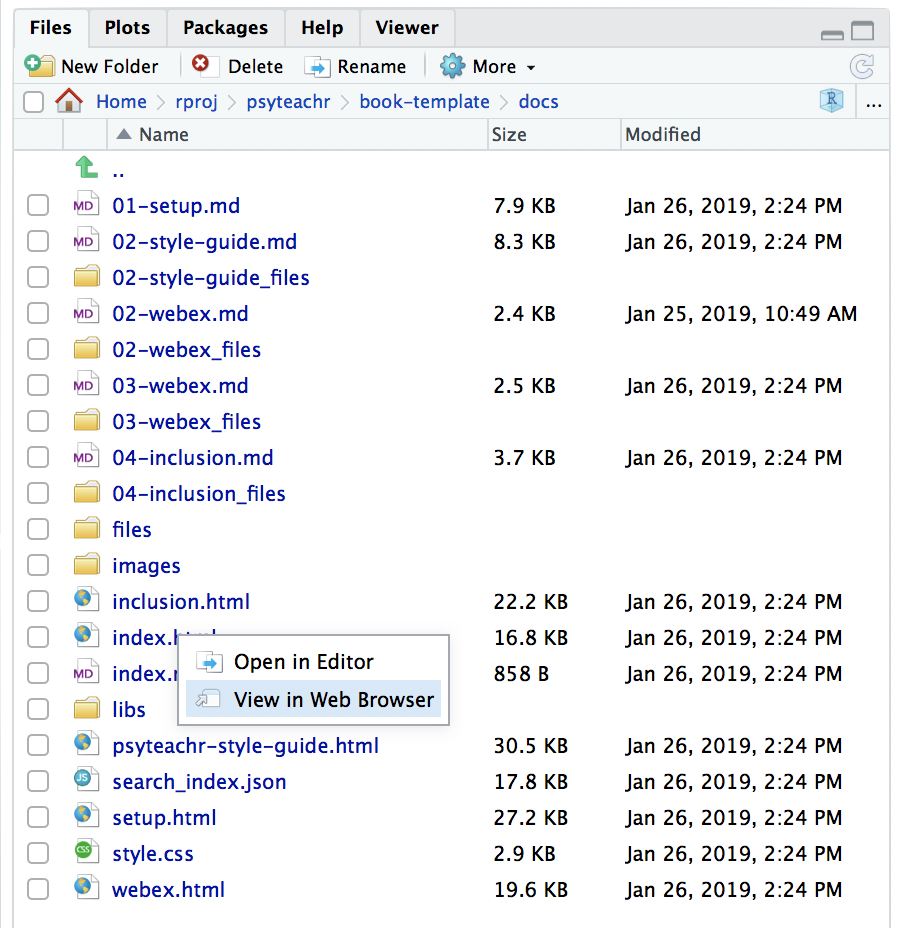
You can open the docs directory in the Files pane of RStudio, click on index.html, and choose View in Web Browser.

Open your book from the Files pane in RStudio.

Figure 1.1: Open your book from the Files pane in RStudio.

1.2 Adding chapters

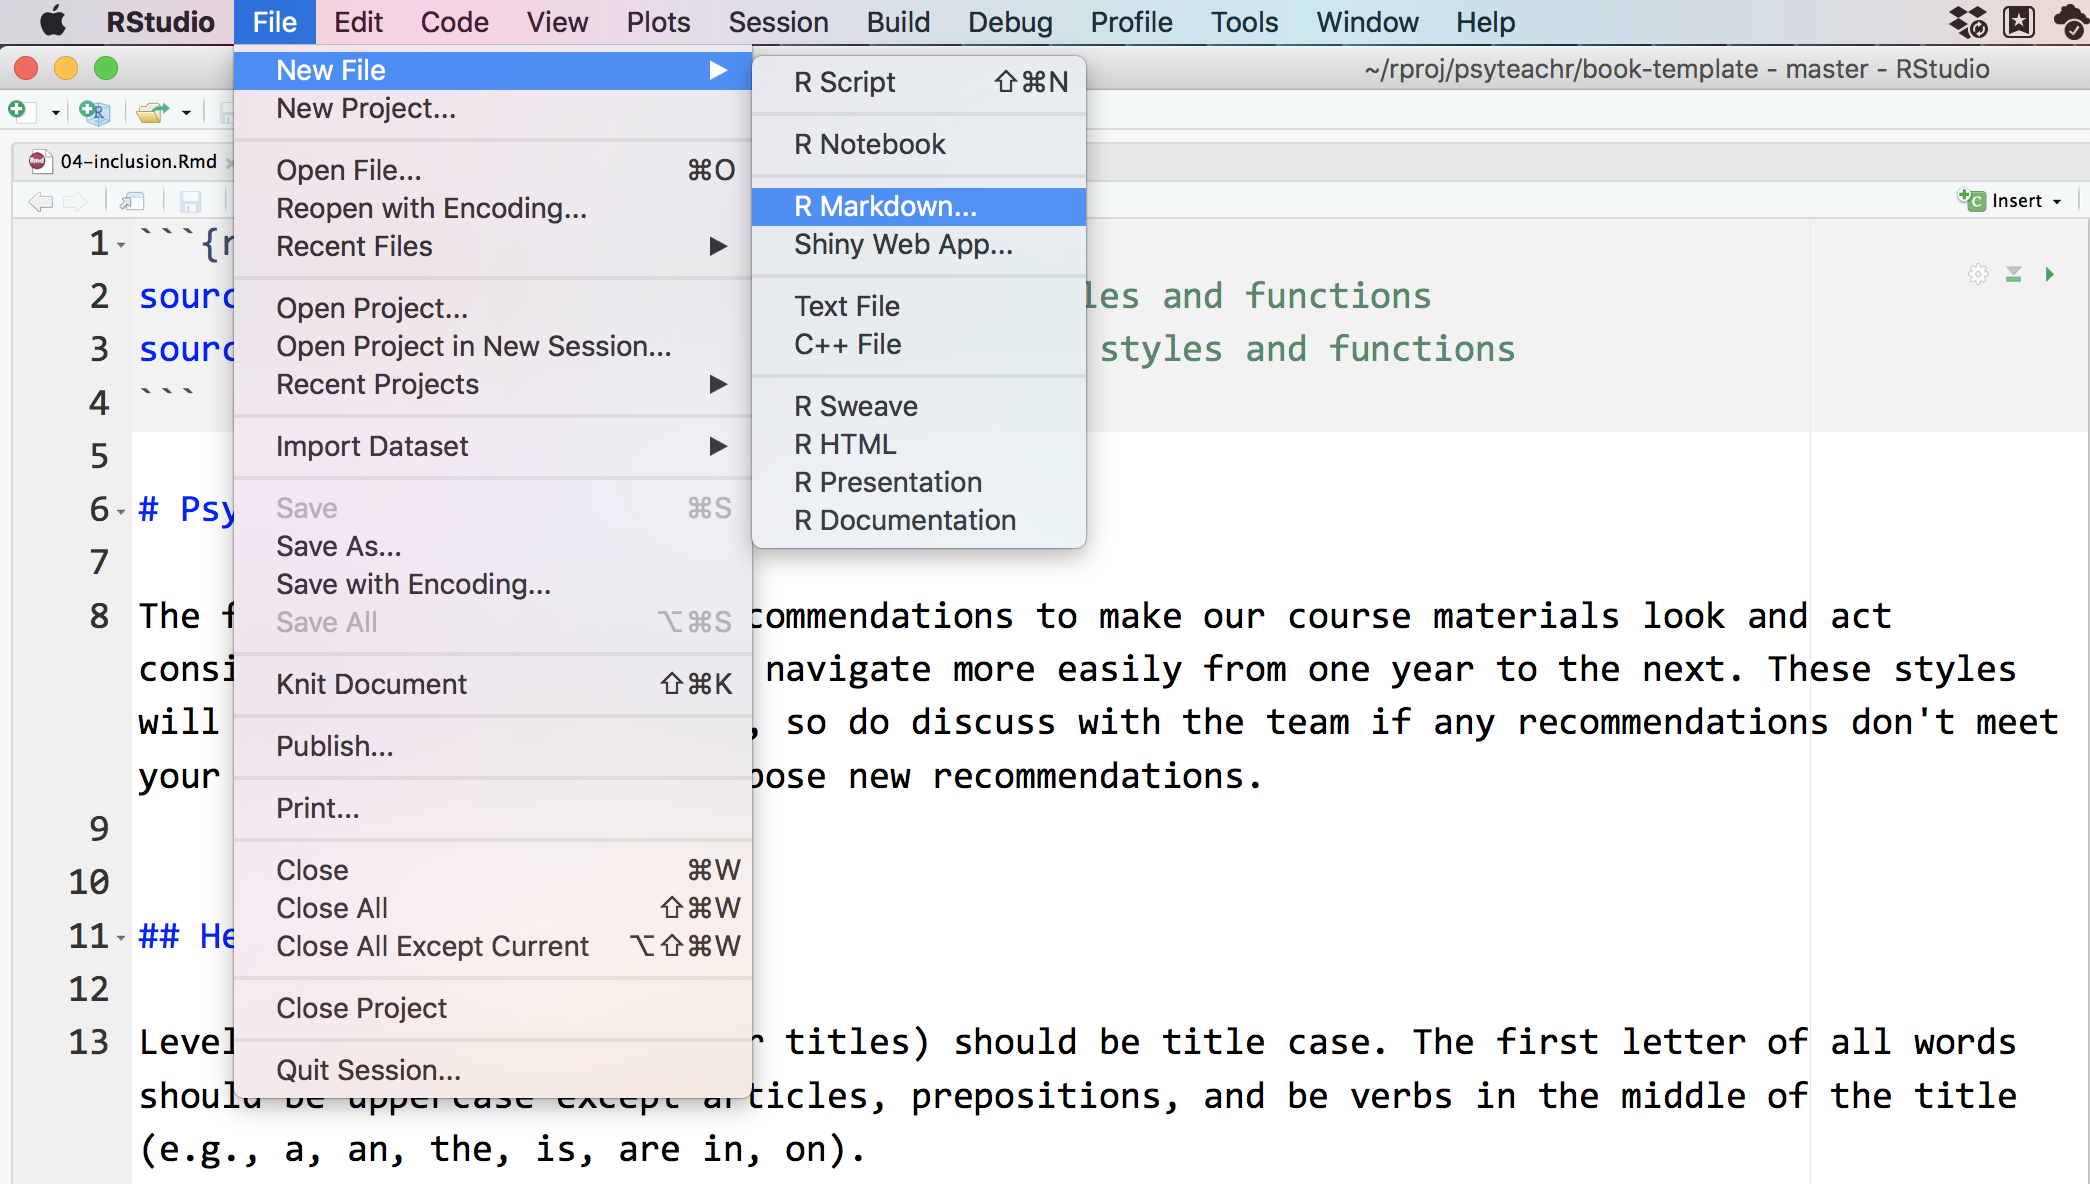
Create new chapters by creating new R Markdown files. Under the File menu in RStudio, choose New File and R Markdown.... Don't bother adding a title or changing any default settings; the first thing we'll do is delete all of the content.

Make a new chapter in a new .Rmd file

Figure 1.2: Make a new chapter in a new .Rmd file

Name the file with the chapter number and a short title all in lowercase, separated by dashes, like 01-getting-started.Rmd. Chapters will render in alphabetical order by filename (you can specify the order in the yml, but it's a pain), so all chapters need to start with a number or they'll end up in the appendix.

1.2.1 Content

Start your chapter with a level 1 header. This will be the chapter title. You can then continue to write your chapter in R Markdown.

You can refer to any section by it's label, which is the section title with spaces changed to dashes (e.g., a section called "Your first R Markdown file" can be referenced as #Your-first-R-Markdownfile. You can set a shorter custom label for a section by adding an ID in the format {#rmarkdown}.

1.2.2 Multiple .Rmd files per chapter

You can break a chapter up into separate .Rmd files like 01.1-prep, 01.2-in-class, 01.3-homework with a level 1 header only at the start of the first section of the chapter. If you do this, you'll get the following warning when you render the book; you can just ignore it.

Warning message:
In split_chapters(output, gitbook_page, number_sections, split_by,  :
  You have 7 Rmd input file(s) but only 6 first-level heading(s). Did you forget first-level headings in certain Rmd files?

1.2.3 Rendering a single chapter

After you've added several chapters, the whole book might take a long time to render. If you want to quickly check the formatting on a single chapter, use the following code.

browseURL(
  xfun::in_dir("book", bookdown::preview_chapter("02-style-guide.Rmd"))
)

1.2.4 Adding appendices

Add appendices in the same way as chapters. Just name them following the pattern appendix-a-name.Rmd.

The file appendix-0.Rmd just contains the appendix header that groups appendices together (# (APPENDIX) Appendices {-}). You don't need to edit this, but you can delete this file if you are not going to use appendices.

1.2.5 Automatic setup scripts

Every .Rmd file automatically runs two scripts to load libraries you'll probably use on every page and set consistent styles for figures across books. The code is located in separate files, so you can make updates in a single place that affect every chapter.

If there is a package you'll need in every chapter, you can create a file called R/my_setup.R. Don't edit R/psyteachr_setup.R; this file is likely to need periodic updating and it is easier to just replace it than to figure out what changes you made. Any code in R/my_setup.R will be loaded after and overrule code in R/psyteachr_setup.R (e.g., if you want to set a different ggplot theme — but please don't unless you have a good reason!).

1.3 Publishing your book

  1. Render the book
  2. Commit your changes (you can do this from the command line if you're comfortable with git)
    • In the Git pane, select all files,
    • Click one checkbox under Staged to check them all
    • Click the Commit button
    • Write a commit message describing the changes you made
    • Click the Commit button
  3. Push your changes to GitHub
    • click the Push button with the green up arrow
  4. Set up GitHub Pages (This only needs to be done once per repository)
    • run the code usethis::use_github_pages(branch = usethis::git_branch_default(), path = "/docs") and choose your forked repo, or...
    • Go to the repository on GitHub
    • Click on the Settings tab
    • Scroll down to GitHub Pages
    • Change Source to "master branch /docs folder"
    • If the page refreshes, scroll back down to GitHub Pages and you should see a green bar with "Your site is published at https://xxxxxx.github.io/repo-name/"
    • Click on the link to see your book
    • It will usually take a few minutes for your files to be copied over to the web server, so refresh a few times

1.4 Getting a DOI

You can gve your book a DOI using Zenodo.

1.4.0.1 .zenodo.json

Open .zenodo.json. If you can't see this file, you need to change your settings to be able to see invisible files (that start with .). In RStudio, go to the Files pane, click on More, and choose Show Hidden Files.

Edit the file to make it applicable to your book. You can add more authors to the "creators" list. Update the version and publication date each time you update the DOI. We follow the version numbering scheme for R packages. In-prep (beta) versions should have version numbers starting with 0.0.9000, and the first full release should be 1.0.0.

{
    "description": "The 2019-2020 version of the course book template for the Institute of Neuroscience and Psychology at the University of Glasgow.", 
    "license": "cc-by-sa", 
    "title": "PsyTeachR Book Template", 
    "version": "1.0.0",
    "upload_type": "software", 
    "publication_date": "2020-05-12", 
    "creators": [
        {
            "name": "Lisa DeBruine",
            "affiliation": "University of Glasgow",
            "orcid": "0000-0002-7523-5539"
        },
        {
            "name": "Phil McAleer",
            "affiliation": "University of Glasgow",
            "orcid": "0000-0002-4523-2097"
        }
    ], 
    "access_right": "open", 
    "related_identifiers": [
        {
            "scheme": "url", 
            "identifier": "https://PsyTeachR.github.io/book-template/", 
            "relation": "isSupplementTo"
        }
    ]
}

1.4.1 Setting up a DOI for the first time

  1. Log into Zenodo using your github account
  2. Go to GitHub Settings and follow the instructions to access your github account and enable the relevant repository
    • Flip the switch to turn on Zenodo for your repository
    • Go to that repository on github.com
    • Click releases
    • Click the Create a new release button
    • Make sure the tag version, title, and description are consistent with the version, title, and description in .zenodo.json
    • You don't need to attach any files or binaries
    • Check "This is a pre-release" if you are just setting up your DOI and this version isn't complete
    • Click the Publish release button
  3. Add your badge
    • Go back to Zenodo and click on the DOI to get the badge. If it's yellow, then Zenodo is still processing your updates, so wait a minute and refresh until it turns green
    • Copy the HTML version
    • Open _output.yml and add the HTML badge as follows: before: | <li><a href="./">Book Template</a></li> <li><a href="https://zenodo.org/badge/latestdoi/000000000"><img src="https://zenodo.org/badge/000000000.svg" alt="DOI"></a></li>
    • You can also add the citation to a README file for your repository and anywhere else you like.

1.4.2 Updating your book

You only need to do this when you are publishing a new major version, such as adding new chapters or big revisions between years.

  • Make sure the .zenodo.json file is up to date
  • Create a new release on GitHub
  • Go to Zenodo to get your updated DOI and badge (or you can just use the all-versions DOI rather than the version-specific one)

1.5 Converting to a package

You can convert your book to a package to gain a few advantages:

  1. Students can access the course book offline
  2. You can include all packages to be used in the course as dependencies so they are all downloaded with the book package
  3. You can include datasets for the course
  4. You can include any other resources, such as template files

If you already have a book set up like above, follow these steps to convert it to a package:

1.5.1 Package Infrastructure

Run the following code to create some of the package infrastructure. You can do everything manually, but I like to use the extremely helpful package usethis.

# create a package DESCRIPTION file
usethis::use_description(check_name = FALSE)

# add license (change psyTeachR to main author)
usethis::use_ccby_license("psyTeachR")

# create the directory where the local copy of the book will go
dir.create("inst/book", recursive = TRUE)

# ignore book files when building the package
usethis::use_build_ignore("_bookdown_files")
usethis::use_build_ignore("files")
usethis::use_build_ignore("include")
usethis::use_build_ignore("images")
usethis::use_build_ignore("^.*\\.Rproj$", escape = FALSE)
usethis::use_build_ignore("^.*\\.Rmd$", escape = FALSE)
usethis::use_build_ignore("^.*\\.yml$", escape = FALSE)
usethis::use_build_ignore("^.*\\.bib$", escape = FALSE)
usethis::use_build_ignore("^.*\\.tex$", escape = FALSE)
usethis::use_build_ignore("^.*\\.rds$", escape = FALSE)

1.5.2 Edit the DESCRIPTION file

The package name has a few rules:

  • Contain only ASCII letters, numbers, and '.'
  • Have at least two characters
  • Start with a letter
  • Not end with '.'

1.5.3 Add packages

Add any CRAN packages you want included with your package.

usethis::use_package("dplyr")
usethis::use_package("tidyr")
usethis::use_package("ggplot2")
# usethis::use_package("tidyverse", type = "depends")

If you want to add tidyverse, you need to add it with type = "depends" and it will load automatically when you load this package. However, this can cause a lot of problems when installing the package, so I would not recommend it.

1.5.4 Add a book function

This is a function to open the local copy of the book in a web browser. Make a file called R/book.R and include the following code (replacing the relevant items with your course and package names).

#' Open the {YOUR COURSE NAME} book
#'
#' @return NULL
#' @export
#'
book <- function() {
  file <- system.file("book", "index.html", package = "YOURPACKAGENAME")
  utils::browseURL(file)
}

1.5.5 Render the book

Render your book and copy the content of docs (the online version) to inst/book (the offline package version).

# render a chapter or the whole book
bookdown::preview_chapter("01-setup.Rmd")
bookdown::render_book("index.Rmd")

# copies docs dir to inst/book
R.utils::copyDirectory(
  from = "docs", 
  to = "inst/book", 
  overwrite = TRUE, 
  recursive = TRUE)

1.5.6 Install your package

# updates your documentation and 
# makes new functions/datasets available
devtools::document() 

# install the updated package
devtools::install()

# load your package
library("your.package.name")

# open the book
book()

1.5.7 Add datasets

To add datasets, add a data_raw directory and edit the file DATASET.R to prep your datasets. Here's an example:

usethis::use_data_raw()

## code to prepare `DATASET` dataset goes here

factorial_2w2b <- faux::sim_design(
  within = list(time = c(am = "Day", pm = "Night")),
  between = list(pet = c(dog = "Dog Owner", cat = "Cat Owner")),
  n = 25, mu = list(am = c(10, 12), pm = c(12, 14)), 
  sd = 5, r = 0.5, plot = FALSE)

usethis::use_data(factorial_2w2b, overwrite = TRUE)

You can set up the documentation by hand following the instructions at https://r-pkgs.org/data.html or use the following script to set up datasets from .csv or .xls files.

# function for creating dataset descriptions in Roxygen
make_dataset <- function(dataname, title, desc, itemdesc = list(), filetype = "csv", source = "", write = TRUE) {
  
  # read data and save to data directory
  datafile <- paste0("data-raw/", dataname, ".", filetype)
  if (filetype == "csv") {
    data <- readr::read_csv(datafile, col_types = readr::cols())
  } else if (filetype == "xls") {
    data <- readxl::read_xls(datafile)
  }
  # this is awkward, but devtools::document won't work unless the saved data has the name you intend to use for it
  dat <- list()
  dat[[dataname]] <- data
  list2env(dat, envir = environment())
  e <- paste0("usethis::use_data(", dataname, ", overwrite = TRUE)")
  eval(parse(text = e))

  # create Roxygen description
  items <- paste0("#'    \\item{", names(itemdesc), "}{", itemdesc, "}")
  
  s <- sprintf("# %s ----\n#' %s\n#'\n#' %s\n#'\n#' @format A data frame with %d rows and %d variables:\n#' \\describe{\n%s\n#' }\n#' @source \\url{%s}\n\"%s\"\n\n",
               dataname, title, 
               gsub("\n+", "\n#'\n#' ", desc), 
               nrow(data), ncol(data),
               paste(items, collapse = "\n"),
               source, dataname
  )
  if (!isFALSE(write)) write(s, paste0("R/", dataname, ".R"))
  invisible(s)
}

After you set up the function above at the top of your DATASET.R file, you can add datasets as below (either from files you've added to data-raw or by creating and saving CSV files (e.g., using faux).

# add country codes dataset
ccodes <- read_csv("https://raw.githubusercontent.com/lukes/ISO-3166-Countries-with-Regional-Codes/master/all/all.csv")
write_csv(ccodes, "data-raw/country_codes.csv")

itemdesc <- list(
  "name" = "Full country name",
  "alpha-2" = "2-character country code",
  "alpha-3" = "3-character country code",
  "country-code" = "3-digit country code",
  "iso_3166-2" = "ISO code",
  "region" = "World region",
  "sub-region" = "Sub-region",
  "intermediate-region" = "Intermediate region",
  "region-code" = "World region code",
  "sub-region-code" = "Sub-region code",
  "intermediate-region-code" = "Intermediate region code"
)

make_dataset("country_codes", 
             "Country Codes", 
             "Multiple country, subregion, and region codes for 249 countries.\nFrom https://github.com/lukes/ISO-3166-Countries-with-Regional-Codes", itemdesc, source = "https://raw.githubusercontent.com/lukes/ISO-3166-Countries-with-Regional-Codes/master/all/all.csv")

This will create a new file in the R directory called country_codes.R that contains your dataset description. Add it to the package documentation by running devtools::document().

1.5.8 Add Shiny Apps

You can add shiny apps to you package easily. Just put any app directories in inst/apps and add the following code to a new file R/app.R (replacing "YOUR.PACKAGE.NAME").

#' Launch Shiny App
#'
#' @param name The name of the app to run
#' @param ... arguments to pass to shiny::runApp
#'
#' @export
#'
app <- function(name, ...) {
  appDir <- system.file(paste0("apps/", name), package = "YOUR.PACKAGE.NAME")
  if (appDir == "") stop("The shiny app ", name, " does not exist")
  shiny::runApp(appDir, ...)
}

Make sure you add shiny and any other packages used in your shiny app as dependencies. Document to add the app() function and install the updated package.

usethis::use_package("shiny")
usethis::use_package("shinydashboard")
devtools::document()
devtools::install()